

Day-5: IAM : Users, User Groups and IAM Roles


IAM : Users, User Groups and IAM Roles
Amazon Web Services(AWS) is a secure cloud services platform that offers a broad set of cloud-based products. It provides high-level security to data at a low cost to its users. There are many types of security services in AWS but Identity and Access Management(IAM) is one of the most widely used. So in this blog post, we will learn about IAM and also learn how to create IAM users, groups, and roles.
What is IAM?
IAM stands for Identity and Access Management. It enables you to manage access to AWS services and resources in a very secure manner. It is used to set users, permissions, and roles. With the help of the IAM service, an organization can create multiple users, each with its own credentials and the user is only able to access the services that are assigned to him/her. IAM is a feature of your AWS account offered at no additional charge.
Why do we need IAM?
By default, the root account user has access to all resources for all AWS services.
Now what is a root user or account, how it is different from IAM users?
A root account is an account through which you have signed up providing your card and billing details. IAM user accounts are user accounts that you can create for individual services offered by AWS.
Assume that you are the head of an organization and there is a team of 10 persons in your organization that work on some projects and deploying them in AWS.
You obviously don't want to give your root account credentials to your developers or DevOps and ask them to deploy apps. So, the main purpose of IAM is to manage AWS user identities. IAM is used to control who is authentication(signed in) and authorized(has permission) to use resources and services.
IAM Identities

An IAM identity represents a user, user groups and roles, and can be authenticated and then authorized to perform actions in AWS. IAM identity can be associated with one or more policies.
Policies is an object that, when associated with a user or user groups or roles, defines their permissions.
IAM Users
AWS IAM User is an entity that you create in the AWS account to represent the person that uses it to interact with AWS. It allows the account holder (user) to execute certain tasks in AWS. A user is made up of a name, password for the AWS Management Console and access keys to use with the API or CLI.

IAM User groups
The User group is a collection of IAM users. It let you to assign permissions for multiple users, which can make it easier to manage the permissions for those users. So, the users that require the same permissions can be grouped together. A user group can contain many users, and these users can also belong to multiple user groups. Changes made to a group are reflected to all users within that group.

IAM Roles
"An IAM role is an IAM identity that you can create in your account that has specific permissions." It is not uniquely associated with a single person; it can be used by anyone who needs it. A role does not have any security credential l, i.e., username password or security key. It can be used to grant access to the AWS resources, services IAM users, third parties, federated Users etc.
How to create an IAM user?
You can create one or more IAM users in your AWS account. Follow these simple steps to create an IAM user:
Step 1:- Open your favorite browser and navigate to AWS Login Page
Then enter details in your usermail, password and click submit. You have now successfully signed in to the AWS Management Console.
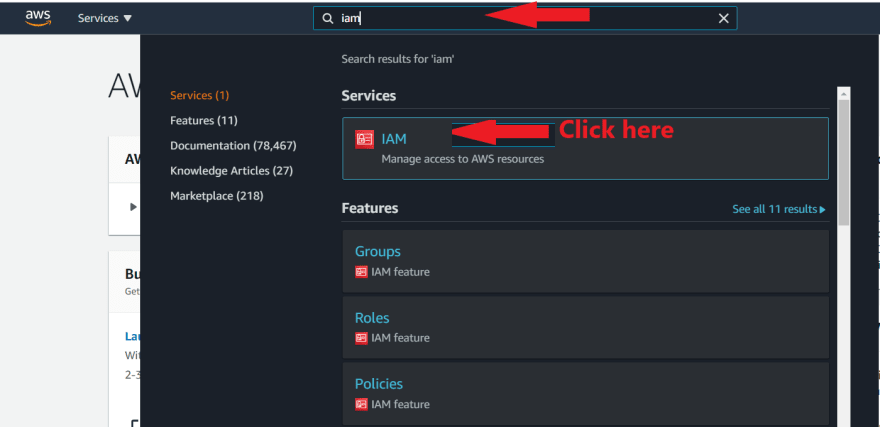
Step 2:- In the search bar type IAM and click on IAM(Manage access to AWS resources) to navigate to IAM Dashboard.
Step 3:- On the left side of the page, you should see an option called Users.

Click on that option, and you will be taken to the Users Page.
Step 4:- Click on Add user button to create a user.
Step 5:- Enter a username that can be used to log in later.
Access type
When creating a user, you must choose between the following access types:
a.) Programmatic access: If the IAM user needs to make API calls, use the AWS CLI or the Tools for Windows PowerShell then choose Programmatic access.
b.) AWS Management Console access: If the user needs to access the AWS Management Console, create a password for the use.
For now I will go with the second option i.e., AWS Management Console accessConsole Password
For Console password, choose one of the following:
Autogenerated password:- Each user will get the autogenerated password that meets the account password policy.
Custom password:- Each user will get the password you type in the textbox. Make sure your password meets the password policy.Require password reset:- By using this option users are forced to change their password the first time they sign in. It is not mandatory to use this option but recommended one for best practices.
After completing all the required steps click on the Next: Permissions button.
Step 6:- Now you need to set permissions for your users. Choose one of the following three options:
a.) Add user to the group:- If you have created any group and you want to add your user to the specific group you can choose this option. You can select one or more existing groups.
If you don't know how to create the group don't worry I will discuss it later.
b.) Copy permissions from existing user:- Choose this option to copy all the existing permissions boundaries and policies from an existing user to the new user.
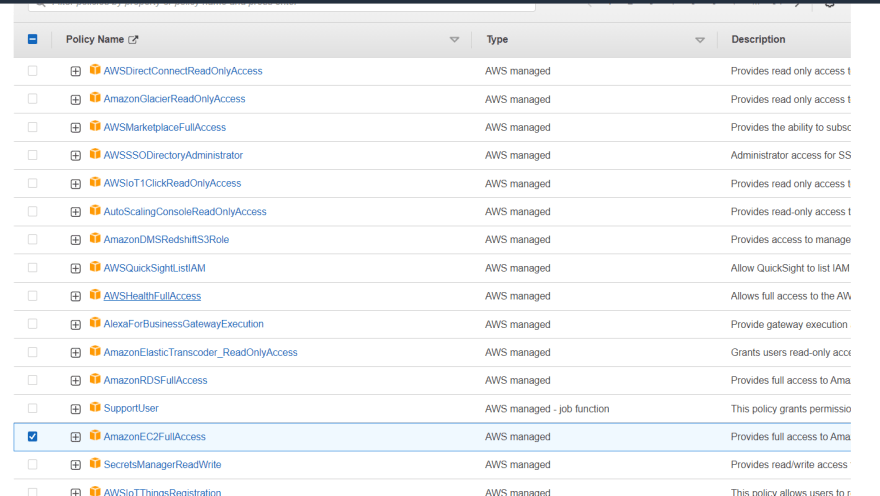
c.) Attach existing policies directly:- AWS has a list of a large number of policies. Select the policies that you want to attach to the new users. You can also create your own custom policy.

For now, I am going to use the third option i.e Attach existing policies directly.
After setting the permissions click on the Next: Tags button.
Step 7:- Tags come in handy when we need to find a certain person in a huge group. This is a totally optional step you can skip it if you want.

Now, Click on the Next: Review button.
Step 8:- On this page you will see all of the choices you made up to this point.
After reviewing all the options click on the Create User button.
Congratulations you have created an IAM user. To save the access keys, choose Download .csv and then save the file to a safe location.
How to Login as an IAM user?
Step 1:- Copy the link and use it to login in an incognito mode as an IAM User.
Step 2:- Enter the username and password and click sign in.
And you can see that you can access EC2 as you've provided the permission while creating that user.
🤔IAM User Groups
We've discussed what is an IAM User and how to create an IAM User. Let's learn how to create IAM user groups and how to add users to groups.
Step 1:- Open your favorite browser and navigate to AWS Login Page
Then enter details in your mail, password bars and click submit. You have now successfully signed in to the AWS Management Console.
Step 2:- In the search bar type IAM and click on IAM(Manage access to AWS resources) to navigate to IAM Dashboard.
Step 3:- On the left side of the page, you should see an option called Users groups.
Click on that option, and you will be taken to the Users groups Page
Step 4:- Click on Create group button to create a new group.
Step 5:-
⚫ Provide a Group name
⚫ Select the Users who needed to be a part of the group.
⚫ Provide any permissions from existing policies
Scroll down and click on Create group button.
Congratulations you have created an IAM User group
How to create IAM roles for a service?
Step 1:- Sign in to AWS Management Console. In the search bar type IAM and click on IAM(Manage access to AWS resources) to navigate to IAM Dashboard.
Step 2:- On the left side of the page, you should see an option called Users groups.

Step 3:-Click on Create role button to create a new role.

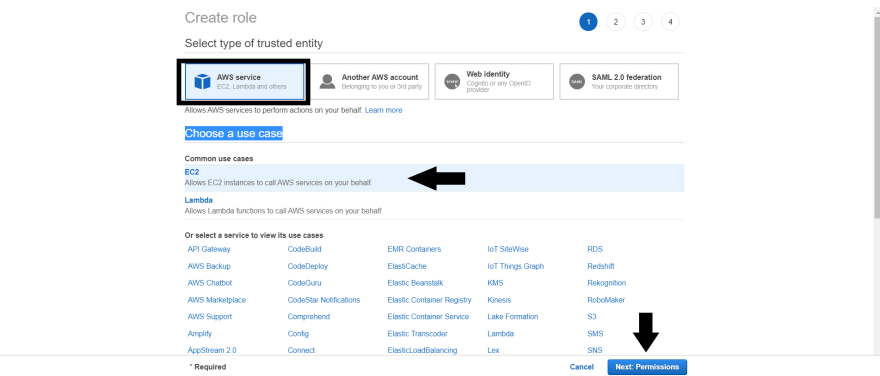
Step 4:- Choose the AWS service that you want to use with the role.
Step 5:- Provide any permissions from existing policies or you can also attach custom policies.

After attaching policies click on the Next: Tags button.
Step 6:- Add tags if you want and click on Next:Review button.
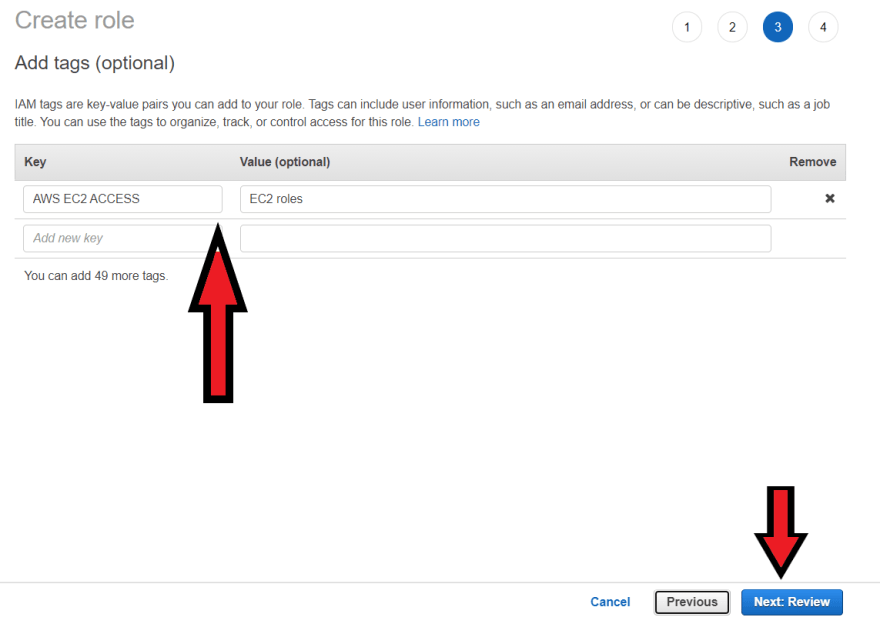
Step 8:- In a role name box, enter the role name. After completing all the required steps click on Create role button.
Congratulations you have created an IAM role🤩🤩.
Now how to attach it to any AWS service🤔😬
Let's attach it to AWS EC2 instance:-
Step 1:- First create an AWS EC2 instance.
If you don't know how to create an EC2 instance, I recommend you to checkout this article once -> How to create an AWS EC2 instance?
Select the “EC2 Instance” as we did by selecting our “Testing Instance“,
Step 2:- Click on “Actions” button and from the “drop-down menu” go to the “Security” again a new menu will be shown, from there look for “Modify IAM Role“, and select it.

Step 3:- Select the IAM role from the drop-down options and then hit Save button.

To confirm the IAM role attachment, select you EC2 instance and check the security tab, you will see the IAM role has been successfully attached.

Resources
. https://docs.aws.amazon.com/IAM/latest/UserGuide/introduction.html